15 Creative Valentine’s Day Photoshoot Decor Ideas
Valentine’s Day presents a wonderful opportunity to capture memories through thoughtfully designed photoshoots. Whether you’re a professional photographer planning client sessions or someone looking to create beautiful images at home, the right decor can transform ordinary photos into extraordinary keepsakes. The beauty of Valentine’s Day photography lies in its versatility—you can craft everything from elegant romantic settings to playful, whimsical scenes that celebrate love in all its forms.
Creating an impressive photoshoot doesn’t require a professional studio or expensive equipment. With creativity, basic materials, and strategic planning, anyone can design stunning Valentine’s Day photography setups. The key is understanding which decorative elements work best for your vision, how to combine colors and textures effectively, and which props will enhance rather than overwhelm your subjects.
This comprehensive guide explores fifteen creative decor ideas that will elevate your Valentine’s Day photoshoots. From timeless floral arrangements to modern minimalist concepts, these suggestions cater to different styles, budgets, and skill levels. Each idea offers practical implementation tips to help you achieve professional-looking results without breaking the bank.
Classic Floral Wall Backdrops
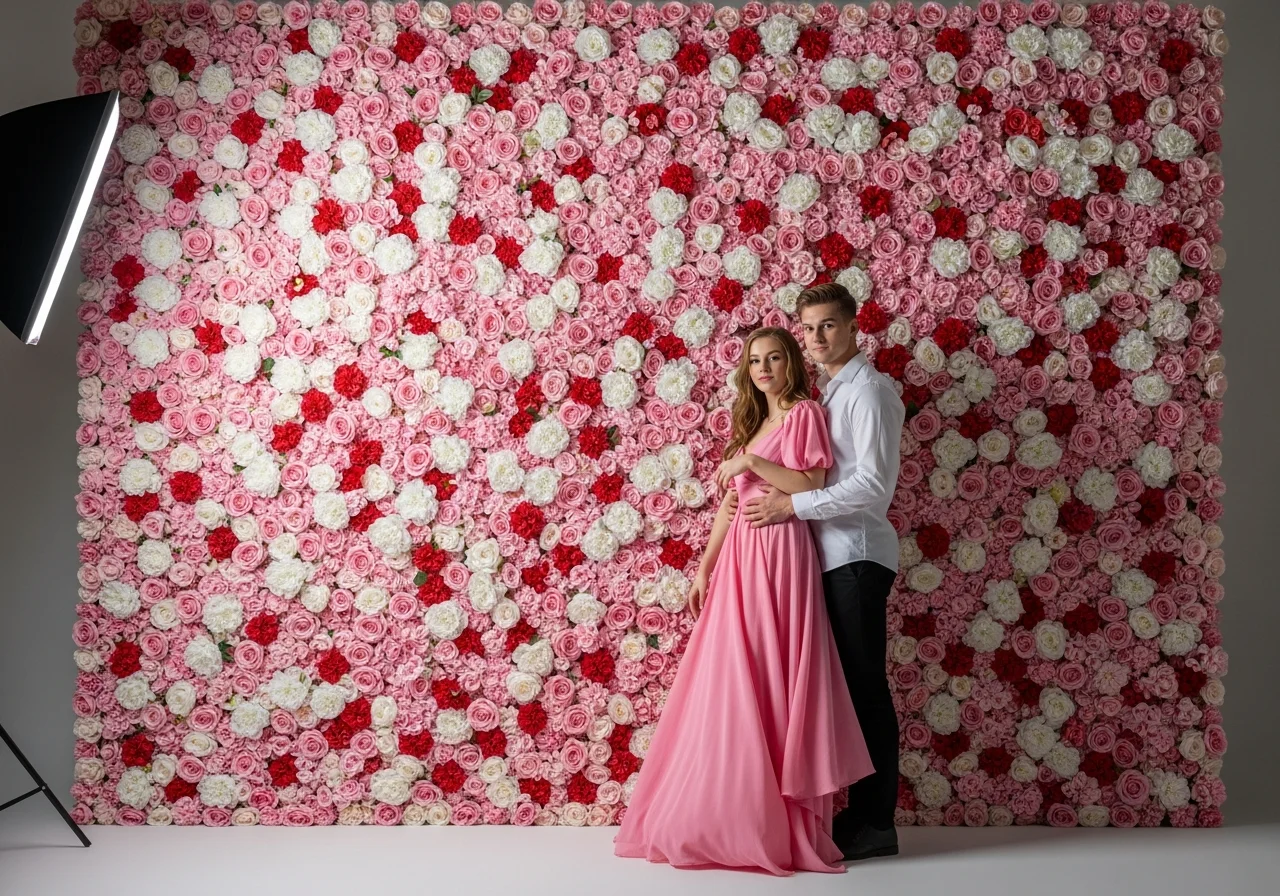
A floral wall stands as one of the most romantic and versatile backdrop options for Valentine’s Day photography. This decor choice works beautifully for couples, families, and individual portraits alike. The lush appearance of flowers creates an enchanting atmosphere that naturally draws the eye and adds depth to photographs.
Creating a flower wall doesn’t necessarily mean purchasing hundreds of fresh blooms. High-quality artificial flowers offer a cost-effective alternative that looks stunning in photos while lasting throughout multiple shooting sessions. Consider mixing different flower types and sizes to create visual interest. Roses remain the traditional choice, but peonies, carnations, and ranunculus add beautiful texture variations.
Installation requires a sturdy base—either a large foam board, chicken wire stretched across a frame, or specialized floral mesh panels. Attach flowers using floral wire or a hot glue gun, working from the bottom up and ensuring complete coverage. Pay special attention to color coordination. While red and pink flowers create a classic Valentine’s aesthetic, incorporating white blooms or even unexpected hues like burgundy or coral can produce sophisticated, contemporary results.
The lighting setup matters significantly with floral walls. Soft, diffused lighting prevents harsh shadows between flowers while highlighting their delicate textures. Position your light source at a 45-degree angle to the backdrop for optimal depth. For added dimension, consider backlighting the arrangement with string lights woven through the flowers, creating a magical glow in evening or indoor shoots.
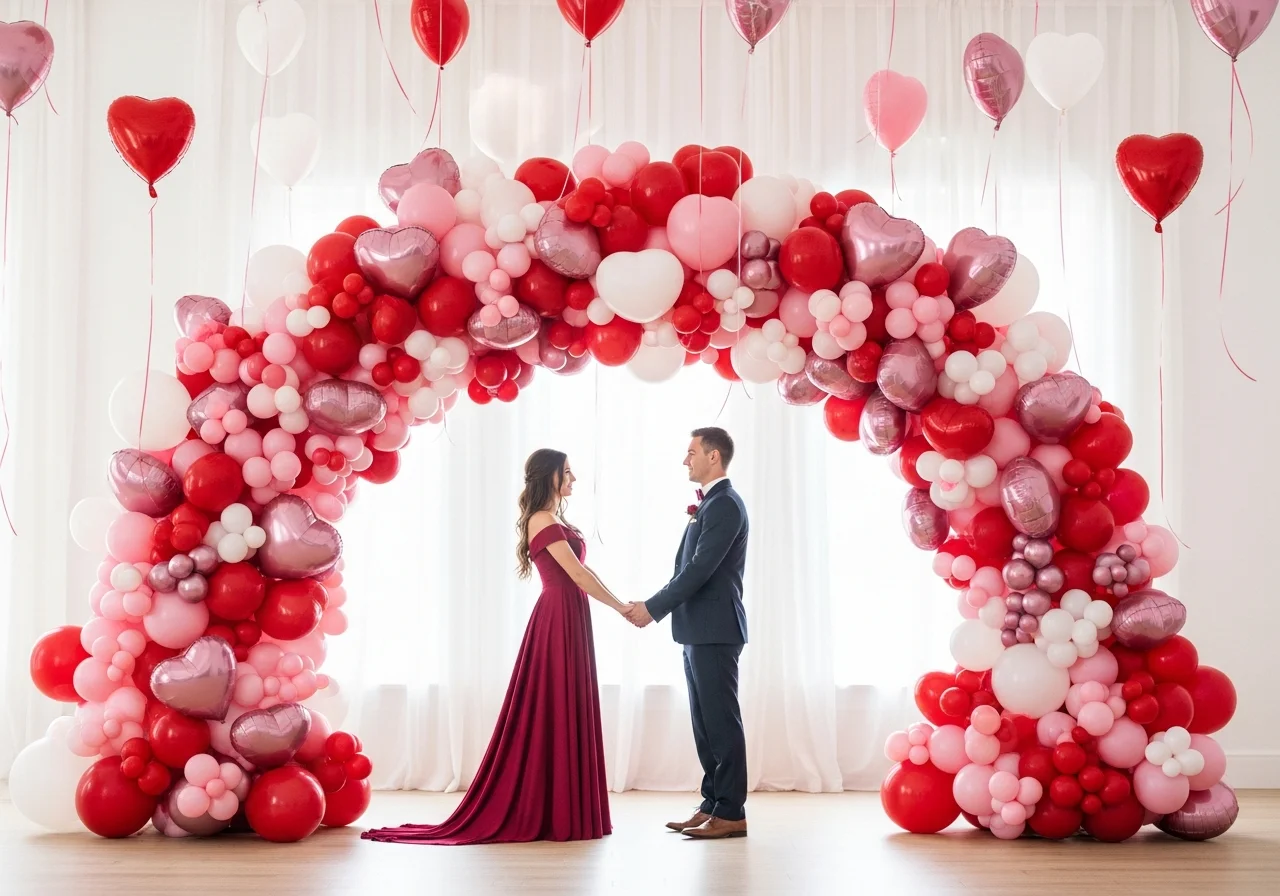
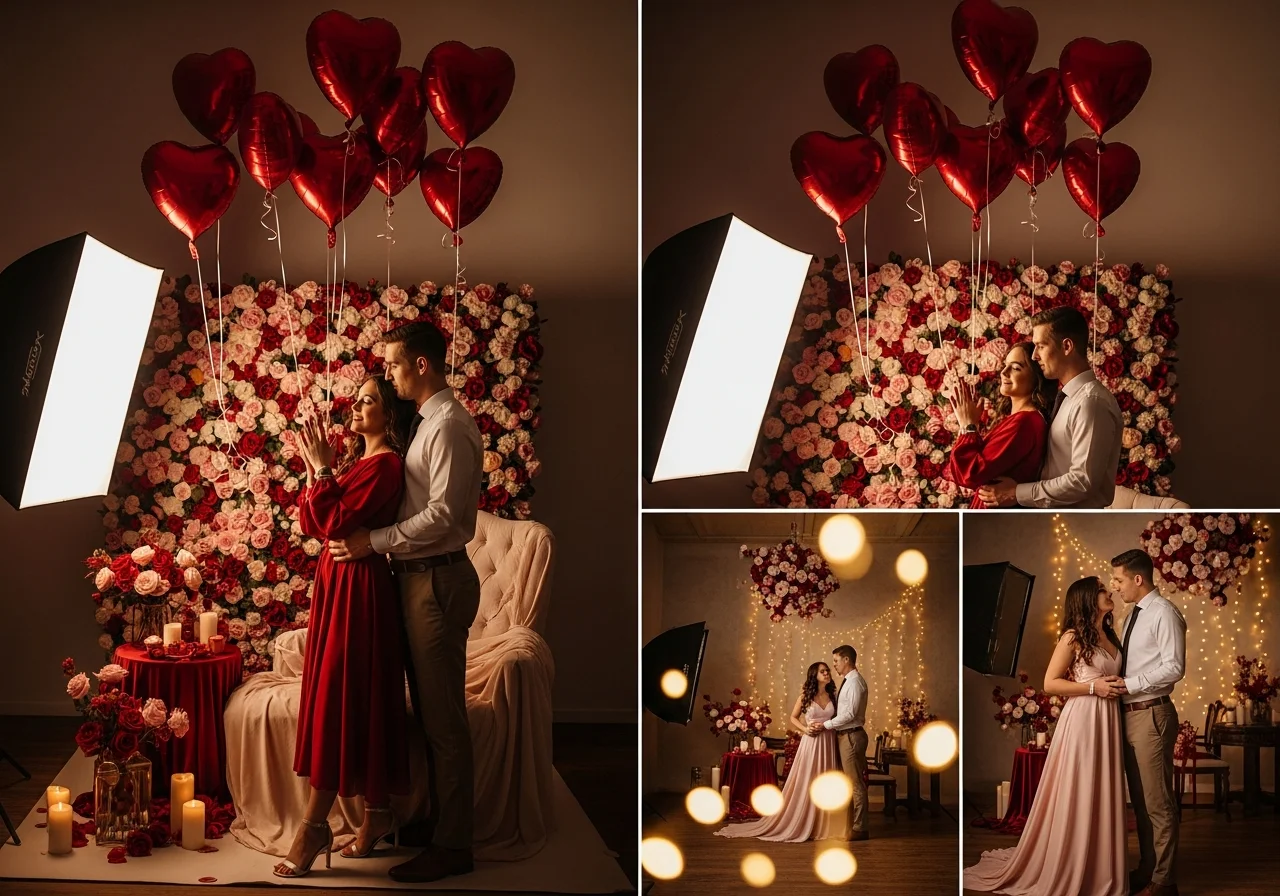
Heart-Shaped Balloon Installations
Balloons bring instant festivity and joy to Valentine’s Day photoshoots. Heart-shaped balloons specifically communicate the holiday theme immediately while creating a playful, celebratory mood. These versatile props work equally well for romantic couple sessions, family portraits, and fun friend photoshoots.
The most impactful balloon installations use generous quantities. A single balloon reads as minimal, but clusters of 10 to 20 balloons create that wow factor photographers seek. Mix sizes for visual interest—combine standard 18-inch heart balloons with smaller 6-inch hearts and round balloons in complementary colors. Stick to a cohesive color palette of reds, pinks, whites, and metallic golds or silvers to maintain sophistication.
Consider different arrangement styles based on your photoshoot concept. Balloon arches frame subjects beautifully and work particularly well for entrance shots or defining a specific shooting area. Balloon bouquets that subjects can hold add movement and interaction to images. Floating ceiling balloons with trailing ribbons create a whimsical overhead element, especially effective when photographed from low angles looking up.
For added creativity, incorporate confetti-filled clear balloons among solid colored ones. The confetti catches light beautifully and adds sparkle to images. When working outdoors, weight balloon arrangements properly to prevent wind damage. Indoors, use monofilament line to suspend balloons at varying heights for a floating effect that photographs with depth and dimension.
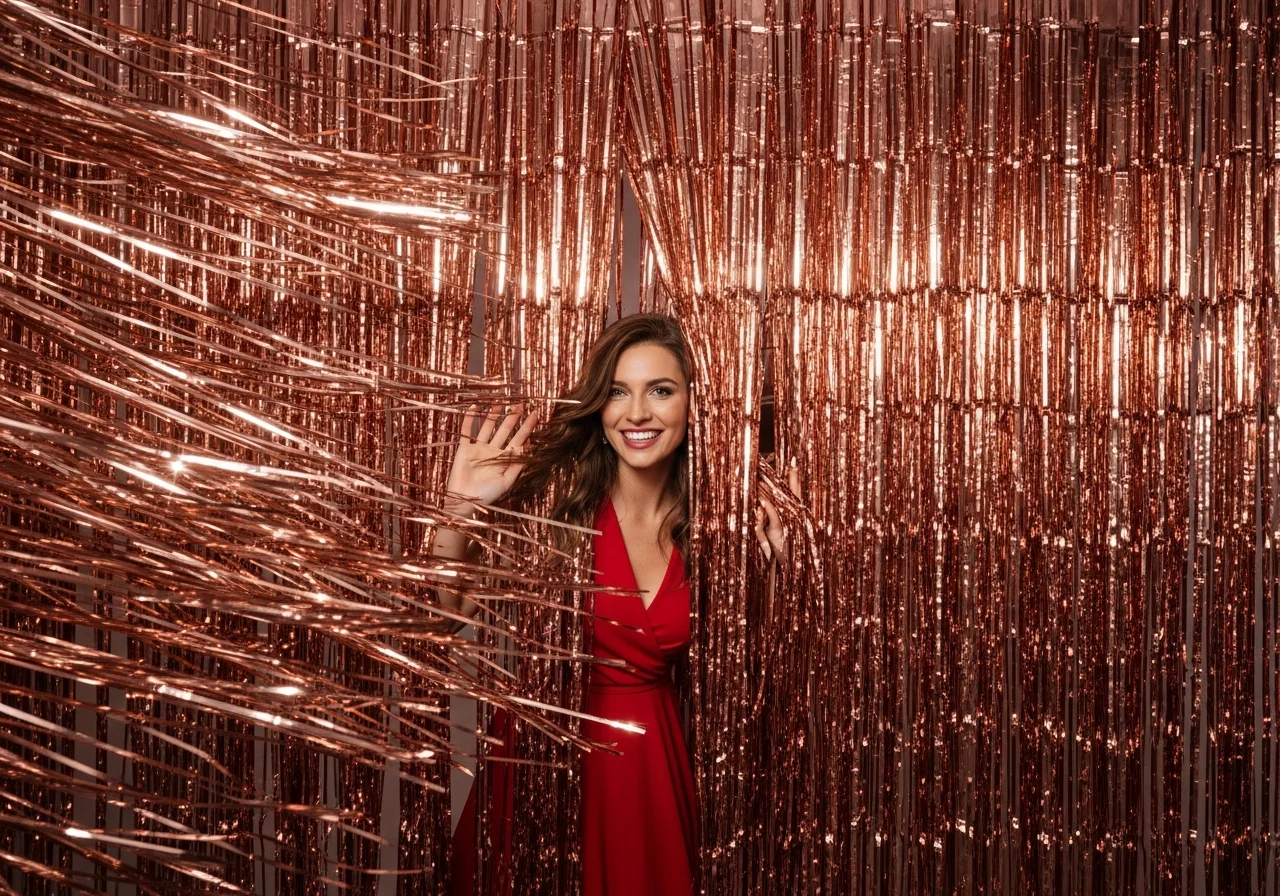
Foil Fringe Curtain Glamour
Foil fringe curtains deliver instant glamour and photogenic shimmer at an incredibly affordable price point. These metallic backdrops catch and reflect light beautifully, creating dynamic images with movement and sparkle. The reflective quality adds a professional, polished look that elevates even casual smartphone photography.
Available in multiple colors, foil fringe curtains adapt to various Valentine’s Day themes. Classic rose gold or champagne tones create romantic, elegant atmospheres. Bright red or pink curtains make bold, energetic statements. For a modern twist, consider silver or iridescent options that shift colors depending on lighting and angle. Many photographers layer multiple curtain colors for a more complex, textured backdrop.
Installation couldn’t be simpler. Most curtains come with an adhesive strip that attaches directly to walls, door frames, or backdrop stands. For temporary setups, painter’s tape prevents wall damage while providing secure attachment. Hang curtains with the fringe fully extended, then gently fluff and separate the strands to maximize coverage and create that signature shimmering effect.
Positioning subjects at least three feet from the curtain prevents the backdrop from appearing too busy or overwhelming the main focus. This distance also helps create pleasing bokeh when shooting with wide apertures. Encourage subjects to interact with the fringe—pushing through it, twirling with strands in hand, or peeking around it adds dynamic movement to otherwise static portraits. The fringe photographs beautifully both in sharp focus and softly blurred, offering versatile creative options.

Intimate Picnic Settings
Valentine’s Day picnic setups combine romance with relaxed, natural interactions between subjects. This decor approach works wonderfully for couples who feel uncomfortable with traditional posed photography. The casual nature of sitting together, sharing treats, and engaging with props creates authentic moments that translate into emotive, genuine photographs.
Start with a quality blanket as your foundation. Plaid patterns in red and white or solid colors in romantic hues work best. Ensure the blanket is large enough for subjects to sit comfortably without feeling cramped—a minimum of 5 by 7 feet accommodates most couples or small families. Layer rugs or throws underneath for added comfort and visual depth.
Thoughtful prop selection enhances the picnic narrative. Include a wicker basket filled with faux foods, wine bottles, champagne glasses, fresh fruit, chocolates in decorative boxes, and pastries on vintage plates. Don’t forget the details—cloth napkins, a small floral arrangement in a mason jar, candles in hurricane glasses, and scattered rose petals complete the romantic atmosphere. Each element should look intentional and curated rather than cluttered.
Location choice significantly impacts your picnic photoshoot’s success. Parks with minimal background distractions, quiet lakesides, lightly wooded areas, or even backyard gardens provide beautiful natural settings. For indoor picnic shoots, position your setup near large windows for soft natural light. The golden hour just before sunset creates the most flattering, romantic lighting for outdoor picnic photography, bathing everything in warm, ethereal tones.
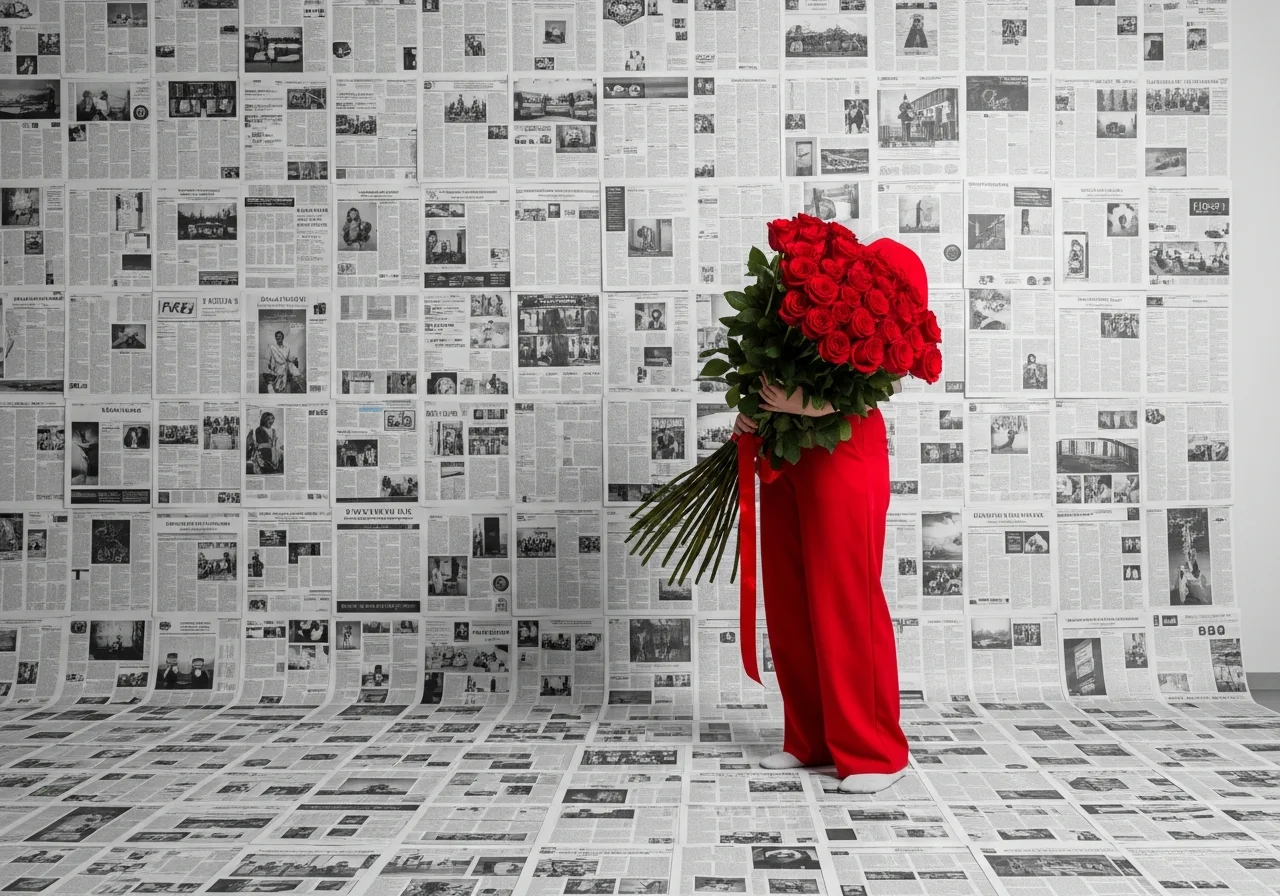
Newspaper Wall Creativity
A newspaper backdrop offers a surprisingly sophisticated, budget-friendly decor solution for Valentine’s Day photoshoots. This unique approach creates clean, monochromatic backgrounds that make colorful props and subjects pop dramatically. The black-and-white print provides interesting texture without competing for visual attention.
Creating a seamless newspaper wall requires planning and patience. Purchase newspapers with predominantly black-and-white pages—avoid colored inserts or advertisements that disrupt the cohesive look. You’ll need approximately 20 to 30 full newspaper sheets to cover an average wall area of 8 by 10 feet. Begin at floor level, taping the bottom edges securely, then work upward in slightly overlapping rows.
The transition between wall and floor is crucial for creating that seamless studio backdrop effect. Continue the newspaper from the wall onto the floor, ensuring the corner where they meet is smooth and continuous. Use wide painter’s tape or masking tape on the backside of newspapers to prevent adhesive from showing in photos. Press firmly along all edges to prevent curling or gaps.
This neutral backdrop works beautifully with vibrant Valentine’s props. Red heart-shaped balloons, pink roses, or subjects wearing bright red clothing create striking contrast against the black-and-white newspaper. The textured background adds visual interest without overwhelming the composition. For added creativity, you can attach paper hearts, love letters, or other Valentine’s decorations directly to the newspaper backdrop, creating layers and dimension.
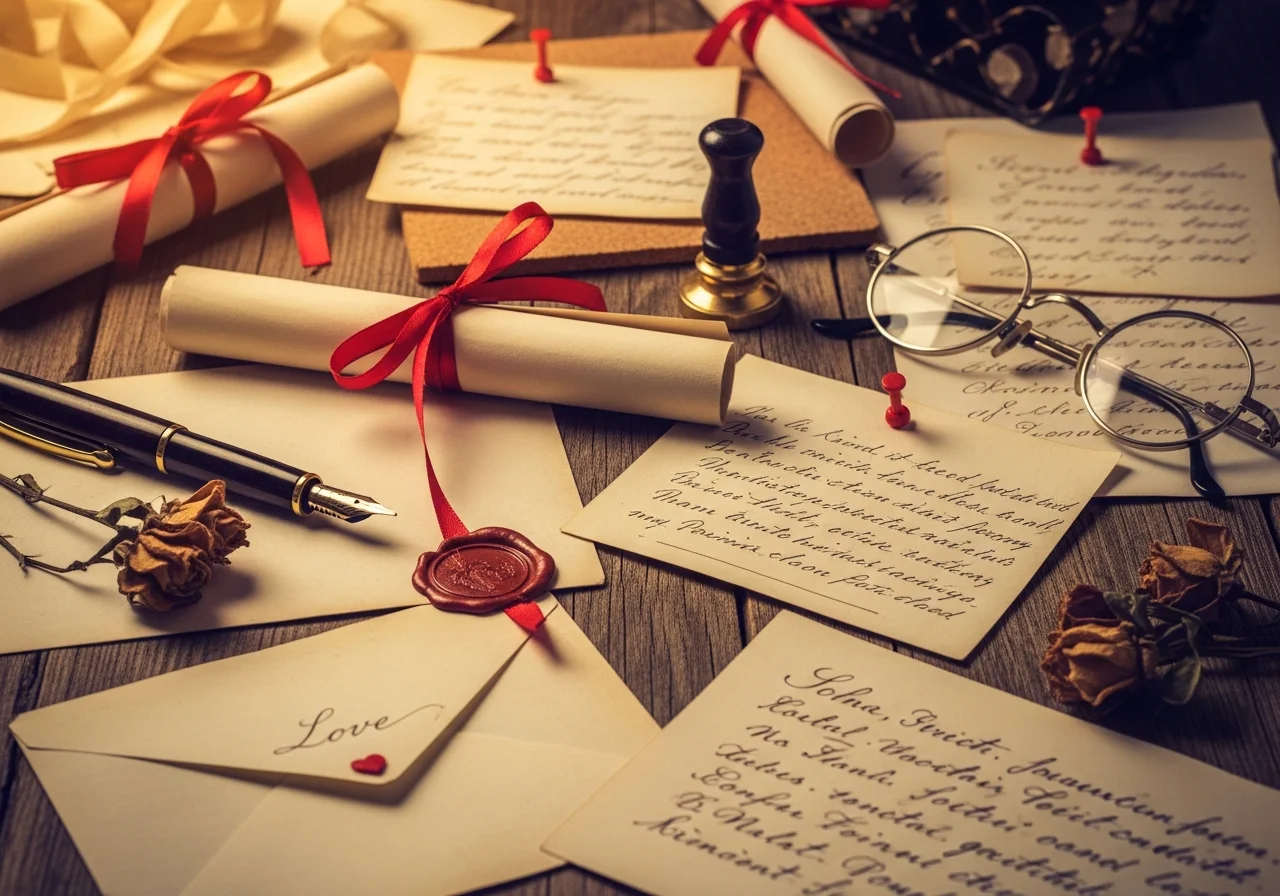
Vintage Love Letters Display
Vintage love letter decor taps into nostalgic romance, creating photoshoot backdrops rich with meaning and emotional resonance. This approach particularly appeals to couples celebrating long-term relationships or those who appreciate classic romantic aesthetics. The handwritten quality of letters adds personal, authentic elements that digital communication cannot replicate.
Crafting convincing love letter props requires attention to detail. Use cream or aged paper—tea-staining white paper creates authentic vintage appearance. Handwrite messages in cursive using brown or black ink. Include classic romantic phrases, poetry excerpts, or create personalized messages meaningful to your subjects. Fold some letters partially, roll others with ribbon ties, and leave a few open to display writing. Varying sizes and arrangements creates visual interest.
Mount letters on a backdrop using several methods. String them on twine or ribbon like a clothesline for a charming, informal display. Attach them to a large corkboard with antique pins for a bulletin board aesthetic. Scatter them across a table or floor for flat-lay photography. Frame several letters in mismatched vintage frames hung at varying heights on a wall. Each arrangement style communicates a different mood and works for various photoshoot concepts.
Enhance the vintage letter theme with complementary props. Antique pens, wax seals, vintage stamps, old books tied with string, spectacles, and dried flowers reinforce the nostalgic atmosphere. Sepia-toned or black-and-white photography processing can further emphasize the vintage aesthetic. However, color photography with muted, warm tones also works beautifully, especially when subjects wear period-inspired clothing in soft neutrals, burgundies, or muted pinks.

Giant Paper Heart Installations
Oversized paper hearts make bold visual statements in Valentine’s Day photography. These large-scale decorations create immediate impact and clearly communicate the holiday theme. The beauty of paper hearts lies in their versatility—they work as backdrops, hanging installations, or floor decor depending on your creative vision.
Creating giant hearts requires minimal materials but produces maximum impact. Large poster boards from craft stores or dollar stores provide the perfect base. For a standard 4-foot heart, you’ll need four 22 by 28-inch poster boards. Sketch half a heart shape on two boards, cut them out, then trace and cut duplicates. Join sections with heavy-duty tape on the backside to create a seamless appearance from the front.
Color and finish choices affect the overall aesthetic significantly. Solid red or pink hearts create classic Valentine’s looks. Metallic gold or rose gold adds glamorous sophistication. For modern, graphic appeal, try bold patterns like stripes, polka dots, or geometric designs. Consider creating multiple hearts in coordinating colors and sizes for a more dynamic, layered installation.
Display methods vary based on your shooting space and concept. Lean giant hearts against walls for simple, striking backdrops. Hang them with fishing line at different heights to create floating effects. Cut sections from hearts to create frames through which subjects can peer or reach. Lay multiple hearts on the floor for overhead flat-lay photography. Paint or write messages on hearts using contrasting colors—phrases like “XOXO,” “Love,” or personalized couple names add customization.

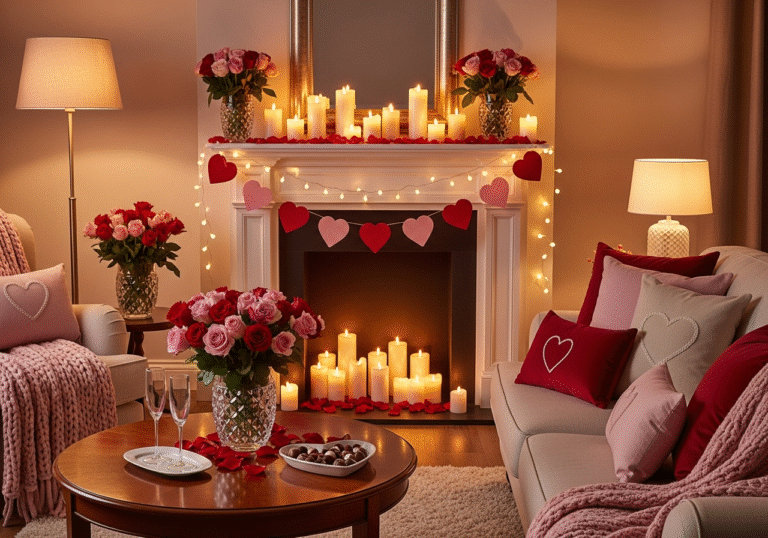
Fairy Light Magic
String lights transform ordinary spaces into magical, romantic environments perfect for Valentine’s Day photography. The soft glow creates flattering illumination while adding sparkle and warmth to images. Fairy lights work in virtually any photoshoot setting—draped across walls, wrapped around furniture, strung overhead, or incorporated into other decor elements.
Strategic placement maximizes the visual impact of fairy lights. Create curtain backdrops by hanging multiple strands from curtain rods or tension rods, spacing them evenly for uniform coverage. Wrap lights around floral installations or balloon arrangements for added dimension. Form heart shapes or spell words using lights attached to walls or boards. Drape lights loosely over furniture or across outdoor spaces to define shooting areas while creating ambient lighting.
The type of lights you choose affects both the aesthetic and practical aspects of your shoot. Warm white or golden lights create romantic, cozy atmospheres ideal for intimate couple portraits. Cool white lights offer a more modern, crisp appearance. For Valentine’s Day, consider pink or red colored bulbs, though use these sparingly as they can cast unflattering color casts on skin tones. Battery-operated lights offer flexibility for outdoor shoots or locations without convenient electrical outlets.
Photographing string lights requires specific technical considerations. In daylight conditions, lights add subtle sparkle but won’t appear illuminated. The magic happens during golden hour or after dark when lights become more prominent. Use slower shutter speeds to capture glowing points of light. For artistic bokeh effects, shoot with wide apertures to blur background lights into soft, circular light orbs. Positioning subjects several feet from light installations prevents harsh lighting on faces while creating beautiful background ambiance.

Minimalist Monochromatic Approach
Not all Valentine’s Day photoshoots require elaborate decorations. A minimalist monochromatic decor approach creates sophisticated, timeless images that focus attention entirely on subjects and their connections. This modern aesthetic appeals to couples preferring understated elegance over traditional romantic embellishments.
The foundation of minimalist photography lies in selecting the perfect background color. Soft blush pink creates gentle, romantic atmospheres without overwhelming femininity. Deep burgundy or wine tones add richness and mature sophistication. Pale lavender introduces unexpected softness while maintaining Valentine’s Day relevance. Even pure white works beautifully when paired with strategic prop placement and natural lighting.
Creating seamless monochromatic backgrounds requires proper materials. Large rolls of backdrop paper from photography suppliers offer professional results but represent significant investments. More budget-friendly alternatives include hanging bed sheets in your chosen color, painting large cardboard panels, or purchasing fabric by the yard from craft stores. Ensure whatever material you choose is wrinkle-free and large enough to fill your frame without showing edges or seams.
In minimalist setups, every element becomes significant. Use a single, perfect prop—one stunning red rose, a vintage perfume bottle, an elegant champagne glass, or a simple gift box with beautiful ribbon. Position it thoughtfully to add visual interest without cluttering the clean composition. Subject clothing becomes even more important in minimalist photography. Solid colors that complement or contrast with the background work best. Guide subjects into natural, relaxed poses rather than rigid, formal stances to maintain the effortless aesthetic.

Candy and Sweets Displays
Incorporating candy and sweet treats into Valentine’s Day photoshoot decor creates playful, colorful, and indulgent atmospheres. This approach works particularly well for lighthearted couple sessions, family photography with children, or themed brand marketing campaigns. The vibrant colors and recognizable shapes of Valentine’s candies photograph beautifully while immediately communicating the holiday theme.
Conversation hearts remain iconic Valentine’s candy choices for photography. Their pastel colors and printed messages add both visual appeal and narrative elements. Scatter them across surfaces, fill clear jars or bowls, spell out words or names, or have subjects hold them. Other photogenic candy options include lollipops, particularly heart-shaped ones, chocolate boxes with visible treats, candy canes in red and pink, and wrapped candies in foil that catches light.
Create candy-themed backdrops by attaching oversized prop versions of favorite treats to walls or boards. Craft foam lollipops, cardboard chocolate boxes, or paper candy wrappers scaled up to dramatic sizes make excellent large-scale decorations. For a more literal approach, create walls entirely of candy by gluing wrapped treats to boards, though this represents a more significant time and monetary investment.
Balance is essential when incorporating edible elements into photoshoots. Too much candy can appear cluttered or juvenile. Instead, use sweets strategically as accent pieces within larger compositions. A beautiful tiered stand displaying chocolates and macarons on a table adds elegance. A clear jar of red and pink candies provides a pop of color on a shelf. Subjects sharing a single lollipop or chocolate creates sweet interaction without overwhelming the frame with props.
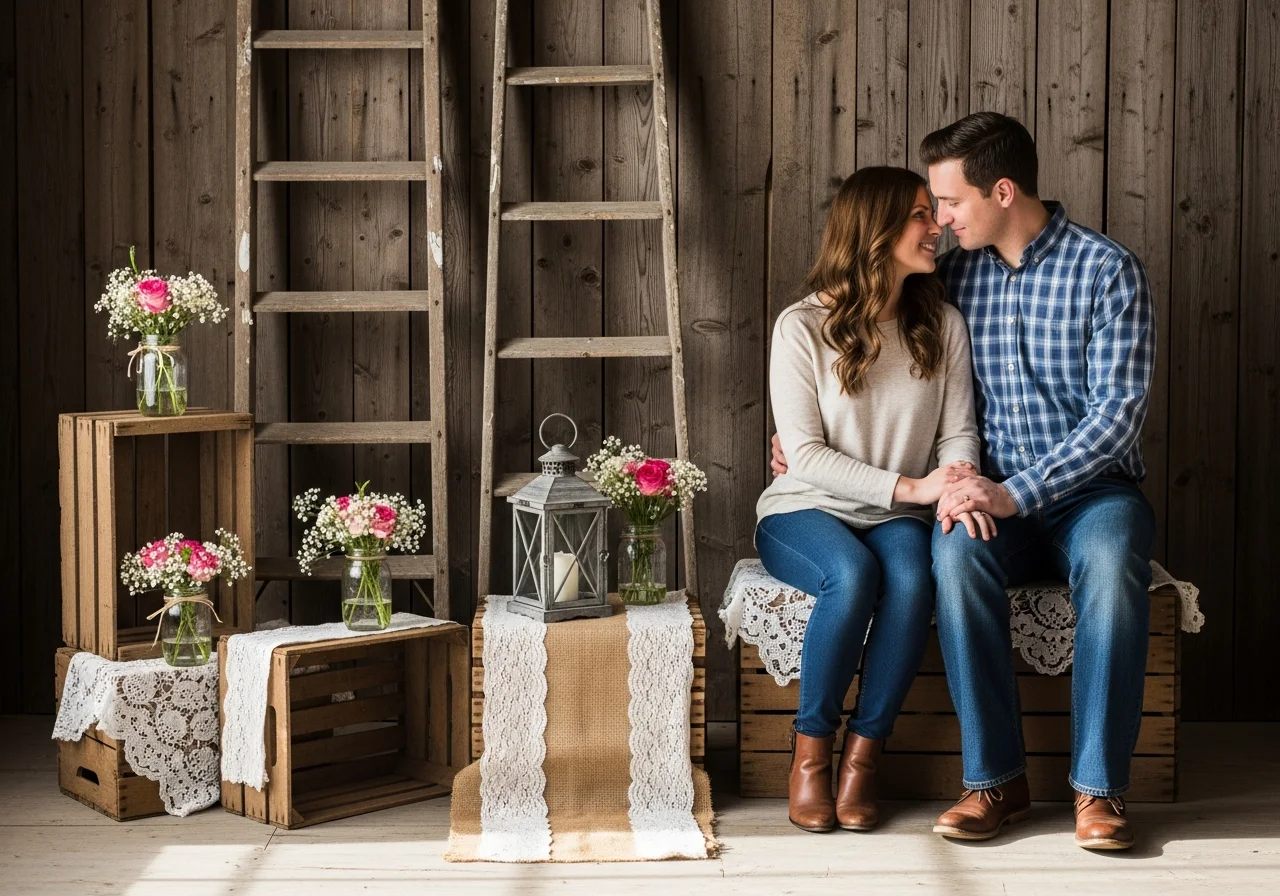
Rustic Wooden Elements
Rustic wooden decor brings organic warmth and texture to Valentine’s Day photography, creating contrast against the typically soft, delicate holiday aesthetic. This approach particularly suits couples preferring natural, earthy styles over traditional romantic themes. Wood elements ground compositions while providing neutral backdrops that highlight colorful Valentine’s props and clothing.
Wooden crates and boxes offer exceptional versatility in photoshoot decor. Stack them at varying heights to create levels and dimension. Use them as platforms for displaying flowers, candles, or other props. Turn larger crates on their sides to create framed spaces where subjects can sit or stand. Vintage wooden ladders provide excellent structures for hanging hearts, lights, or floral arrangements. Weathered wooden pallets positioned vertically create interesting textured backdrops, especially when decorated with painted hearts or hanging elements.
Natural wood finishes work beautifully, but painted wood adds creative possibilities. White-washed or distressed paint creates farmhouse-chic aesthetics. Painting words like “LOVE” or “FOREVER” on wooden boards provides personalized decor elements. Consider mixing raw and painted wood pieces for visual variety while maintaining cohesive natural themes.
Complement wooden elements with appropriate secondary props. Mason jars filled with flowers soften hard wood lines. Burlap runners or banners add complementary organic texture. White lace or doilies create beautiful contrast. Metal elements like vintage buckets, lanterns, or wire baskets introduce industrial touches while maintaining rustic character. When selecting Valentine’s colors for rustic setups, deeper tones like burgundy, dusty rose, and coral typically harmonize better with wood than bright pinks or reds.
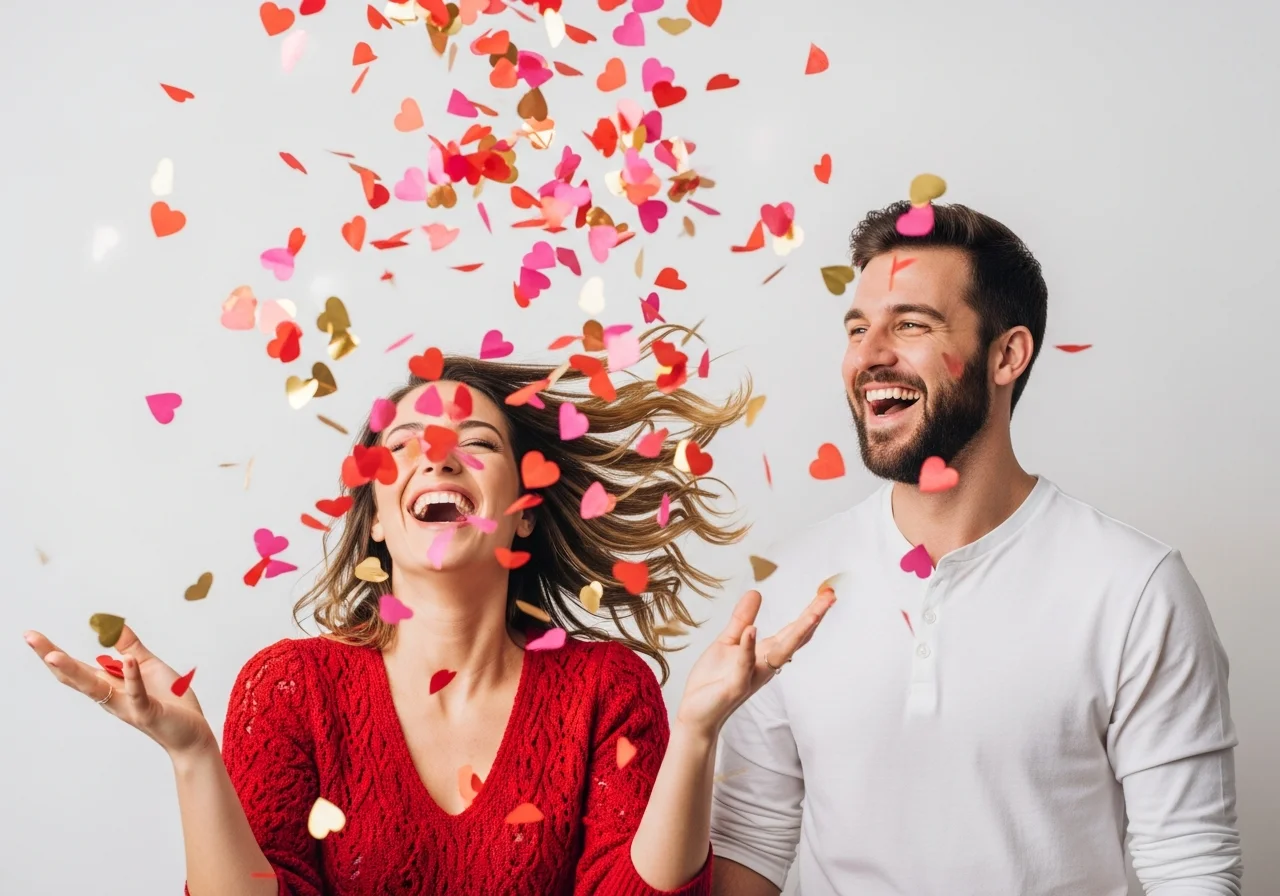
Confetti and Glitter Moments
Confetti and glitter create dynamic, celebratory moments perfect for capturing joyful, energetic Valentine’s Day photographs. These elements add movement, sparkle, and spontaneity to otherwise static portraits. The key lies in using these decorative materials thoughtfully rather than chaotically, ensuring beautiful results rather than messy disasters.
Paper confetti in heart shapes creates obvious Valentine’s Day connections. Circles, stars, or mixed shapes work equally well when using appropriate colors. Purchase pre-cut confetti or create custom versions using paper punches and cardstock in your chosen palette. Metallic or iridinate confetti catches light beautifully, creating sparkle in photographs. Mix sizes for visual interest—larger pieces photograph more distinctly while smaller confetti creates overall texture.
Capturing confetti in motion requires technical photography knowledge. Set your shutter speed to at least 1/500th of a second to freeze falling confetti mid-air. Continuous shooting mode allows you to capture multiple frames and select the best confetti placement. Have subjects throw confetti upward and slightly forward for the most photogenic fall patterns. Multiple throws may be necessary to achieve desired results, so purchase generous quantities.
Glitter offers similar celebratory qualities but requires more careful handling. Fine craft glitter creates the most photogenic results—chunky glitter often photographs less gracefully. Apply glitter to props rather than throwing it freely, as cleanup becomes challenging and glitter can get into camera equipment. Consider glitter on cards, frames, or other decorative elements subjects hold. For controlled glitter effects, seal it under clear contact paper or use glitter cardstock rather than loose glitter.
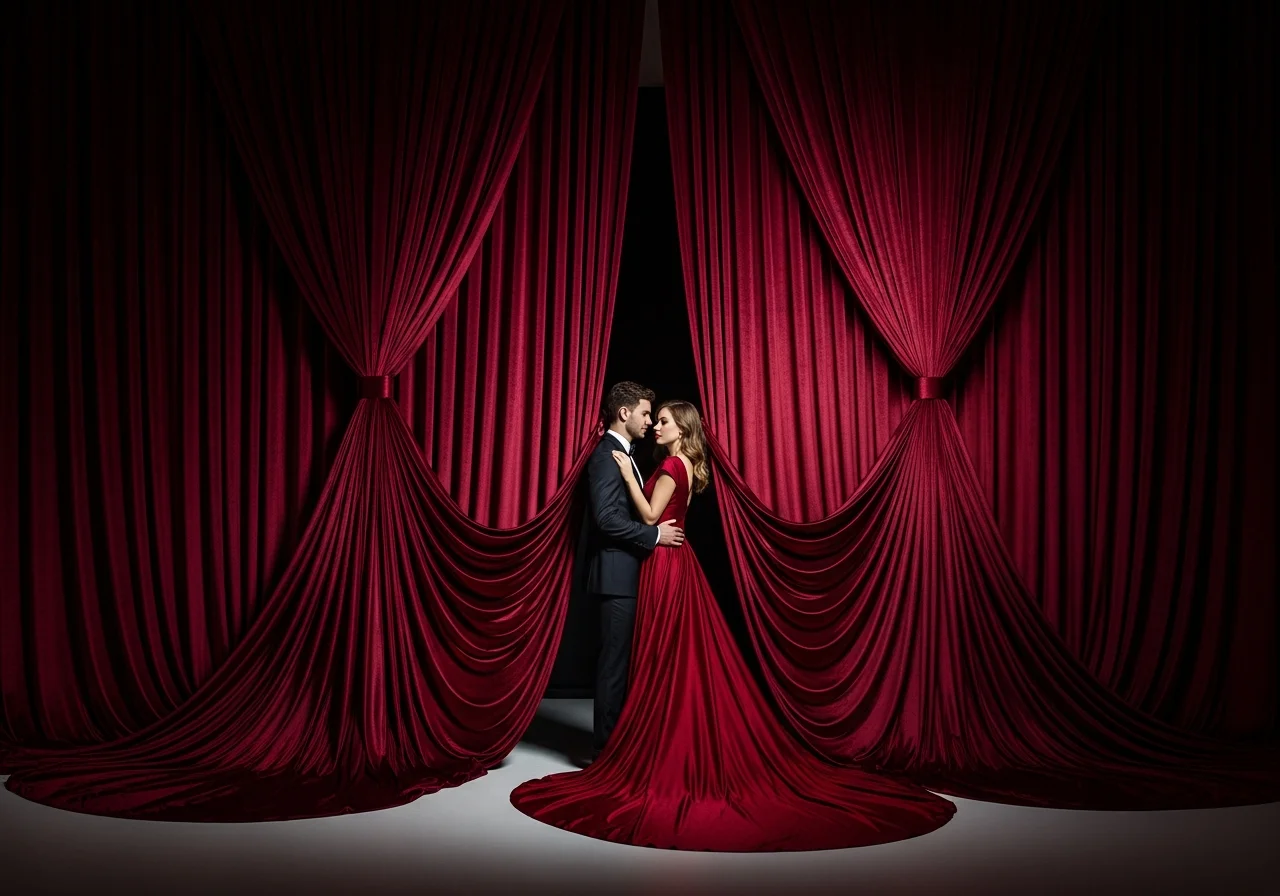
Dramatic Curtain Draping
Flowing fabric curtains create elegant, romantic backdrops with movement and depth. Unlike flat paper backdrops, draped fabric adds dimension and sophistication to Valentine’s Day photography. The soft texture photographs beautifully and can be manipulated to create various moods from ethereal and dreamy to bold and dramatic.
Fabric selection significantly impacts the final aesthetic. Sheer materials like chiffon or organza create light, airy, romantic atmospheres. Light filters through them beautifully, and they photograph with soft, delicate qualities. Heavier materials like velvet, brocade, or satin deliver rich, luxurious appearances perfect for dramatic, sophisticated portraits. For Valentine’s Day, consider fabrics in deep reds, soft pinks, burgundy, or even white for pure, romantic elegance.
Creating professional-looking curtain draping requires proper installation. Install a sturdy rod or tension bar across your desired backdrop area. For ceiling-to-floor installations, calculate fabric length at least 1.5 times your ceiling height to allow proper pooling at the bottom—this creates luxurious gathered appearance. Pinch fabric into pleats or gentle folds as you attach it to the rod, creating depth and texture rather than flat, lifeless panels.
Enhance draped curtains with additional elements. Wind string lights through the folds for magical illumination. Attach flowers, greenery, or paper decorations along the top edge. Allow some curtain panels to sweep forward, creating foreground elements that frame subjects beautifully. Position subjects at varying distances from curtains—close proximity for bold, dramatic backgrounds, further away for softer, more diffused backdrops. Encourage interaction with the fabric—subjects can peak through, wrap themselves in the material, or use it for dynamic movement in images.

Geometric Shapes and Patterns
Modern geometric designs bring contemporary style to Valentine’s Day photography, offering fresh alternatives to traditional romantic themes. Bold shapes, clean lines, and graphic patterns create striking visual impacts that appeal to couples preferring modern aesthetics over classic romantic decorations. This approach works particularly well for younger subjects or lifestyle brand photography.
Create geometric backdrops using tape to form patterns directly on walls. Wide washi tape in Valentine’s colors forms easily removable designs. Create chevron patterns, triangles, hexagons, or abstract arrangements. Alternating colors create additional depth and interest. For more permanent or reusable options, paint geometric patterns on large canvas panels or wooden boards. Stencils ensure consistent, clean shapes if freehand painting seems daunting.
Three-dimensional geometric installations add extra dimension. Construct large geometric shapes from cardboard, poster board, or foam core. Create hanging installations of multiple geometric forms at varying heights. Wire or fishing line allows shapes to rotate gently, adding subtle movement to photographs. Origami-style folded paper hearts or diamonds introduce both geometric qualities and handcrafted charm.
Balance geometric boldness with softer elements to maintain Valentine’s Day connection. Incorporate flowers within geometric frames or vases with angular lines. Use geometric patterned papers or fabrics as table runners or flat-lay backgrounds while styling them with organic flowers and natural elements. Guide subjects into poses that echo geometric compositions—angular arm positions, triangular body arrangements with couples, or using negative space to create shapes around subjects. This conceptual approach creates cohesive images where subjects and decor work together harmoniously.
Outdoor Natural Settings
Taking Valentine’s Day photoshoots outdoors leverages natural beauty while minimizing decor requirements. Nature provides ready-made backdrops that photographs beautifully—forests, beaches, gardens, fields, and parks all offer romantic settings enhanced by thoughtful prop additions. Outdoor shoots also benefit from natural lighting, the photographer’s most flattering tool.
Timing outdoor photoshoots strategically maximizes lighting quality. The golden hour—approximately one hour after sunrise or before sunset—provides warm, soft, directional light perfect for romantic photography. Overcast days offer beautifully even, shadowless lighting ideal for skin tones. Avoid harsh midday sun, which creates unflattering shadows and causes subjects to squint.
Even in natural settings, strategic decor enhances Valentine’s theme. Bring blankets for picnic-style setups in fields or parks. Hang heart garlands from tree branches. Scatter rose petals along paths or beaches. Use balloons weighted with stones as colorful markers defining your shooting area. A single stunning floral arrangement in a vintage vase placed on a tree stump or rock creates an elegant focal point without overwhelming the natural environment.
Location selection should consider background quality and accessibility. Scout locations beforehand, noting times when they’re least crowded if shooting in public spaces. Look for areas with uncluttered backgrounds—simple skies, soft greenery, or water. Avoid locations with distracting elements like trash cans, electrical lines, or busy signage. Consider seasonal factors in your region—some locations may feature beautiful winter landscapes while others offer blooming flowers even in February.
Conclusion
Creating memorable Valentine’s Day photoshoots requires thoughtful planning, creative decor choices, and understanding how various elements work together. The fifteen decor ideas explored here offer diverse approaches accommodating different styles, budgets, and skill levels. Whether you gravitate toward classic romantic florals, modern geometric designs, rustic natural elements, or playful candy themes, the key lies in executing your chosen concept with attention to detail and cohesive styling.
Remember that successful photography decor enhances rather than overwhelms your subjects. Every element should serve a purpose—adding color, creating atmosphere, providing interaction opportunities, or defining the shooting space. Quality matters more than quantity. A few well-chosen, beautifully arranged props create more impact than cluttered, disorganized collections of Valentine’s items.
Don’t feel pressured to create elaborate setups if they don’t align with your vision or capabilities. Some of the most beautiful Valentine’s Day photographs feature minimal decor paired with genuine emotions and connections between subjects. Use these ideas as inspiration rather than strict instructions, adapting and combining elements to create unique setups reflecting your personal aesthetic.
The most important aspect of any Valentine’s Day photoshoot remains capturing authentic love, joy, and connection. Beautiful decor sets the stage, but genuine emotions create timeless photographs that people treasure for years. As you implement these decor ideas, remain focused on facilitating comfortable, relaxed environments where subjects can be themselves. When beautiful settings combine with authentic moments, you create Valentine’s Day photographs that truly celebrate love in all its wonderful forms.
Frequently Asked Questions
What is the best backdrop color for Valentine’s Day photoshoots?
The best backdrop colors for Valentine’s Day photoshoots are soft blush pink, deep burgundy, classic red, and pure white. Blush pink creates romantic, gentle atmospheres that flatter most skin tones. Burgundy adds sophisticated depth perfect for elegant couple portraits. Classic red makes bold Valentine’s statements but works best in moderation. White provides clean, timeless backgrounds that allow subjects and colorful props to stand out. Your choice should align with your overall aesthetic vision and complement your subjects’ clothing choices.
How can I create a professional-looking photoshoot backdrop at home on a budget?
Creating professional backdrops at home requires minimal investment. Use large bed sheets or fabric from craft stores in solid colors for seamless backgrounds. Newspapers taped to walls create unique textured backdrops for under five dollars. Dollar store poster boards can be arranged into colorful walls or cut into giant hearts. Foil fringe curtains from party supply stores cost three to ten dollars and deliver instant glamour. String lights purchased affordably add professional-quality ambiance. The key is using materials thoughtfully with proper installation and styling rather than spending large amounts on specialized photography equipment.
What props work best for Valentine’s Day couple photoshoots?
The most effective props for couple photoshoots encourage natural interaction rather than stiff posing. Heart-shaped balloons that couples can hold together create playful energy. Picnic setups with blankets, champagne glasses, and treats facilitate authentic relaxed moments. Single stems of roses or small bouquets provide elegant focal points without overwhelming compositions. Love letters or cards add sentimental touches. Confetti creates dynamic action shots when thrown together. The best props feel natural to your subjects and enhance rather than distract from their genuine connections and emotions.
What lighting works best for indoor Valentine’s Day photoshoots?
Natural window light provides the most flattering illumination for indoor Valentine’s Day photography. Position subjects near large windows during daylight hours, using sheer curtains to diffuse harsh direct sunlight. For evening shoots or spaces without adequate natural light, use soft artificial lighting. String lights create romantic ambient glow but shouldn’t serve as primary light sources. Ring lights or softbox lights positioned at 45-degree angles to subjects provide even, flattering illumination. Avoid using overhead ceiling lights alone, as they create unflattering shadows. Multiple light sources at moderate intensities generally produce better results than single harsh lights.
How far in advance should I plan and set up Valentine’s Day photoshoot decor?
Plan your photoshoot concept at least two weeks in advance to allow time for purchasing supplies and practicing setup techniques. Order specialized items like custom backdrops or specific props early to ensure arrival before your shoot date. Simple setups using readily available materials like balloons, flowers, and basic props can be executed successfully with just a few days notice. Set up your actual decor the day before or morning of your shoot when possible, particularly for fresh flower arrangements. However, practice your setup at least once beforehand to identify potential issues and refine your arrangement before the actual photoshoot when time pressure increases.